
Summer Camp Crafts: How To Make An Acrylic Pour Painting

Summer is here, which means whether or not summer camp is a part of your summer, you can still do messy, activity oriented crafts (outdoors?) that one might do in summer camp. Acrylic pour painting fits right into that category perfectly, so lets take a look at this trendy painting process.
If you are like me, you are slightly familiar with acrylic pour painting, but have not yet actually thought about trying it, as you’ve got so many other projects on your to-do list or a whole closet of craft supplies yet to be used? When I was asked to write an article about pour painting I was really excited to do the research and find out exactly how those dazzling multi-color paintings are made, and whether it would be something I’d consider trying. This article is a brief guide to help you determine whether indeed you’ll spend the time and money to make some acrylic pour paintings or whether you’ll pass. For a really great and in-depth article on acrylic pour paintings with how-to photos, and everything you need to know check out the post: Learn Everything About Acrylic Pouring. Just a guess, since I’ve discovered that one can actually make pour paintings with some inexpensive supplies, I think you’ll be tempted to try, I know I am! Plus, one can do pour paintings on paper that has been coated with gesso, meaning you could even use those pour paintings as art journal backgrounds, or for something less precious than dictated by doing art on a canvas or wooden cradle board, not to mention that practicing on paper is a good idea. Ah yes, and since acrylic pour painting does not require any drawing or painting skills is it a fun craft/art activity that can be enjoyed by just about anyone over the age of around eight, so get a group together and enjoy! Okay, lets get into the specifics of acrylic pour painting.
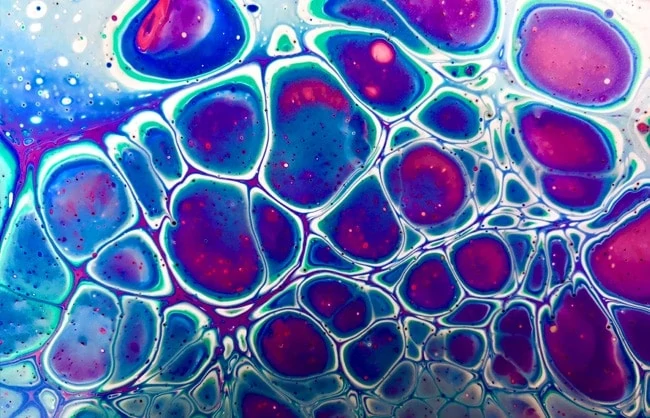
I’ll assume that you are familiar with the look of acrylic pour paintings, which is a very organic, marbelized look as a result of letting physics and chemistry dictate patterns that are created! One can swirl together many colors and create interesting shapes, though all pour paintings look like pour paintings, just as a tie dyed shirt looks like a tie dyed shirt. There are many techniques for applying the paint to the canvas, so really the possibilities are endless. At the moment I’m thinking that creating an interesting piece of wall art without my usual artistic angst/challenge might be really enjoyable! Just keep in mind that acrylic pour paintings will not likely help you find your own unique voice via artistic expression, but rather enable you to create some interesting and possibly even stunning art with relatively little time investment. Sounds good to me, or at least something I’d love to try, and I am hoping to do this with my teens, as it would be a perfect summer vacation art activity. Okay, lets cut to the chase and look at the pros and cons of acrylic pour painting:
Pros Of Acrylic Pour Painting:
- Suitable for beginners, meaning no drawing or painting skills needed
- Not a lot of supplies are needed
- One can start out using inexpensive options and buy more expensive professional supplies later
- Can be done in as little as half an hour
- Unlimited color combinations and truly original one of a kind results
- Perfect as a group activity for a party or get together
- A really exciting process of combining colors and getting unpredictable results
Cons Of Acrylic Pour Painting:
- Uses lots of paint and pour medium relative to creating an acrylic painting
- Somewhat messy, or could get really messy
- Long drying time, at least several days
- Need a dedicated space to let paintings dry, laying flat on a table
- Some waste of paint that drips off canvas/base onto protective surface
- Results are unique but at the same time have a very specific look, like spin paintings, for example

Supplies Needed For Acrylic Pour Painting:
- take a quick look at the instructions, product reviews and in depth information for all things acrylic paint pouring.
- a base for applying the paint: canvas, wood, or paper coated with gesso
- acrylic paint
- pouring medium
- silicone oil
- a heat gun or torch (optional but useful)
- a blow dryer (optional but useful)
- cups for making mixes of paint/pouring medium/silicone oil
- sticks for stirring
- gloves
- protective surface
- push pins to elevate canvas, if using canvas so paint drips off canvas onto protective surface
- a few palette knives or cake icing spreader to move paint around once poured
A Word About Pouring Medium:
If you are an art professional and you sell your paintings, you know that using high quality supplies like paints and mediums is a must to insure longevity of your work. The same applies to acrylic pour painting. That said, all beginners should spend as little on supplies as possible until they’ve mastered their art or craft, and that of course applies to acrylic pouring as well. One can invest in the more expensive and quality acrylic pouring mediums, or start with the least expensive pouring medium option which is a product called Floetrol used either separately or together with Elmer’s glue all.
What Is The Mixing Ratio For Acrylic Pouring?
Finding the perfect ratio of acrylic paint to pouring medium does take some practice, though a general rule of thumb is one part pouring medium to one part paint, resulting in a mixture that is slightly thinner than liquid honey. To increase the viscosity of the mix one can add more medium or water, but no more than 30% of the total mixture should be water, and the less water the better. One can add about 3 drops of silicone oil to the mix in order to generate cells in the painting.
Viscosity is the key to successful pouring. If it is too thin, your beautiful patterns and cells will run off the canvas. If it is too thick, there will be no cells and it will be difficult for you to spread the paint. But once you have found the right consistency, it will be relatively easy to get consistent results in the future. One can combine different pouring mediums and develop your own recipe.
” style=”width: 1080px; min-height: 608px;”>
- Mix acrylic paint with pouring medium and add a few drops of silicone oil (treadmill oil is very inexpensive and it works, try to find a bottle, not aerosol)
- Make sure mix is viscous enough to pour freely but not too viscous such that it runs off the canvas immediately. To make mix more viscous add either more pouring medium or a small amount of water
- If using a stretched canvas prop the canvas up on something (even a few bottle caps) so that paint can run down the sides an onto a surface that will catch the puddles without them adhering to the canvas. If using paper, make sure the paper has a coating of gesso.
- While many pour paint at this point, some flood the entire surface of the canvas with a thin layer of a background color mix, and white is a good start.
- Now is the time to pour, so put on some gloves!
- There are many methods for pouring the paint. Some simply pour the paint onto the canvas and then employ simple techniques such as rotating the canvas or blowing with a hair drier to move the paint around. Small manuevers of the paint can be done by simple blowing on the paint, with your mouth or even a straw. Others pour layers of color into one plastic cup or small plastic container, and then pour that mix onto the canvas. There are many ways to go about this, which is why experimenting using paper is a good idea!
- Bring out the cells by heating the paint slightly with a torch or a heat gun.
- Fill in any blank areas by adding extra paint to that area and very lightly manipulating it with a palette knive or cake icing scraper.
- Set it aside to dry in a place where no animals or children can disturb it and wait a few days.
- If the piece is stunning and truly a work of art, consider giving it a protective coating with acrylic varnish, namely a product that is used to seal acrylic paintings.
- That is it, wow, lets do this!
The Most Important Factor: The best Pouring Medium
The choice of a suitable pouring medium is the key factor to beautiful cells. Only if the consistency of your Pouring mixture fits, also cells develop.
If you are completely new to Acrylic Pouring, you can also use a Pouring set, which includes most of the basic materials you need for your start into the Pouring techniqe.
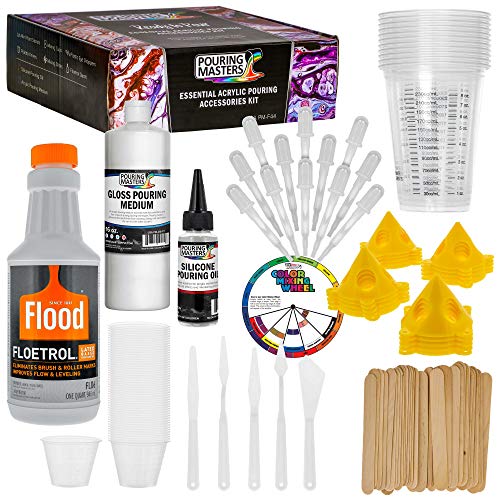
- Everything you need for your start into Paint Pouring
- Included are pouring medium, silicone oil, mixing cups, mixing stick and mini paint stands
- Just use your acrylic paint with this set and get going
Ccrylic Pour Recipes
When you start to pour, it can be a challenge to get the consistency right. We have therefore developed some basic recipes for you to use as a starting point:
1 part acrylic paint
1.5 Parts of painting medium
0.5 Part of distilled water
1 part acrylic paint
1.5 Parts of painting medium
0.5 Part of distilled water
1 part acrylic paint
1.5 Parts of painting medium
1 part distilled water
You should always first mix the acrylic paint with the pouring medium and then add water and silicone oil.
The Secret of Many, Big Cells in Your Pour Paintings
Creating cells in your pourings is one of the main goals of most techniques. But how do you get these cells into your Pourings?
The addition of silicone creates the desired cells on the acrylic flow technique. But with which silicon-containing product do you get the most cells or the largest cells?
Silicone Oil with Low Viscosity:
- The lower the viscosity, the larger the cells
- The paint flows faster
- There are stronger color gradients
Silicone Oil with High Viscosity:
- High viscosity results in rather smaller, but many cells
- The color flow is slower
- There are more clearly defined cells and more color separation
l:
Treadmill is the most used silicone oil for Pouring. It gives you a lot of nice, small to mid-sized cells in your pour paintings. View on Amazon
The Best Painting Grounds for Acrylic Pouring
There are a variety of ways in which they can pour. If you apply any surface with a first layer of acrylic binder and then a primer with Gesso, you can pour on almost any surface.
Canvas

Preparation Work for Your Pour Paint
How to prepare your workplace
- In order to protect your workplace, you should line it with plastic foil
- Wearing rubber gloves is also recommended
- You can fill squeeze bottles with required liquids such as silicone oil and distilled water for better handling and dosing
- If you have any paint stains, it’s worth preparing kitchen paper
- Work in a room that is as well ventilated as possible
Preparing the Painting Ground
If your painting ground is not yet primed, you should use Gesso to pre-treat it. Do the acrylic paint adheres better and does not penetrate into the substrate. Place the canvas in a raised position so that the flowing paint does not stick to the underside. For this purpose you can use used drinking glasses, cups or pinboard pins, which you fix on the backside. Before the actual pouring make sure that the painting ground is aligned in balance. Otherwise it can happen that your paintings flows on one side and is destroyed.
Prepare Your Other Supplies
Before you start, prepare all the necessary pouring materials and aids:
- Acrylic paints
- Pouring Medium
- Cups or other containers
- wooden spatula
- silicone oil
- (Distilled) Water
- Painting knife / scraper
- Torch
Required Acrylic Pouring Supplies
We have put together for you the most important supplies which you need for the different Acrylic Pouring techniques. As a beginner it is not so easy to distinguish between what you need and what you don’t. And with the many different products it’s twice as difficult to keep track of. That’s why we have put together a starter set for you with which you can start pouring right away. Below you find the essential Acrylic Pouring supplies for your beginning:
- Floetrol Starterset: Pouring Medium, Cups and wood mixing sticks
- Sargent Art Acrylic colors 12 piece starter Set
- Treadmill Silicone oil a lot of cells
- White Canvas Starter Set
- Polycrylic Protection Finish
- Paintbrush to apply the protection Finish
- Gloves


